Draft Angles Decoded: My Guide to Successful Mold Release

5 Common Design Flaws that Increase Casting Defects (And How We Fix Them)
2026-08-03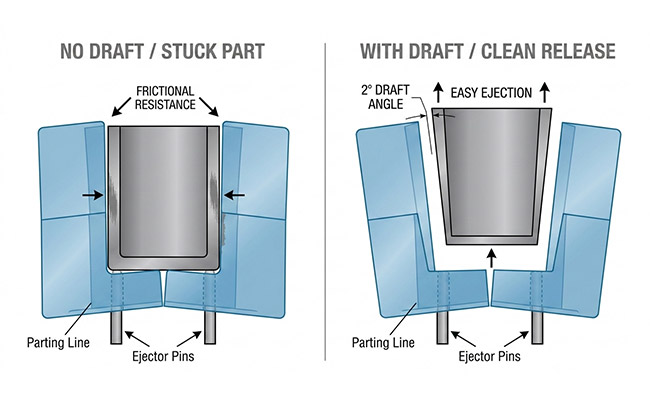
I’ve learned a few things over the years in product design. One of the most critical lessons, often learned the hard way, is this: A beautiful CAD model is worthless if it never leaves the mold. I’ve seen too many brilliant designs turn into expensive, stuck-in-the-mud nightmares on the factory floor, simply because the part wouldn’t eject.
When I first started, I thought draft angles were a minor detail, something to “slap on at the end” of the CAD work to make it manufacturable. Experience has taught me otherwise. Draft is actually the very foundation of moldability. It’s the silent, invisible force that determines whether your production run is a smooth operation or a constant, expensive headache.
Baseline and Beyond
In the world of molding—whether it’s high-pressure die casting, gravity casting, or even basic plastic injection molding—a perfectly vertical, $90^{\circ}$ wall is a liability. As the molten material cools, it shrinks. If that material is wrapped around a “core” (the male part of the mold), it grips it like a vice. Without draft, the friction during ejection causes devastating visual and structural issues.
I’m talking about scuff marks—those ugly white or scratched streaks on the side of your part that ruin a Class A surface finish. Part warpage—where the ejection pins are pushing so hard on a “stuck” part that they actually bend its final geometry. And in extreme cases, a stuck part so severe that it forces a complete, manual teardown of the $100,000 tool, costing days of downtime and immense frustration.
My personal rule of thumb is a $1^{\circ}$ draft on all vertical faces as an absolute baseline. For simple, smooth parts, this is usually enough to break the initial vacuum and allow the part to “pop” free the instant the mold begins to open.
The “Texture Tax”
This is where I see most junior engineers trip up. If you are specifying any kind of “beaded” or “leather-grain” texture on your part surface, you need way more draft. A common mistake is to keep the draft at $1^{\circ}$ for a textured surface, which is a recipe for disaster. Why? Because that texture creates thousands of tiny “undercuts” on a microscopic level, all of which will “grab” the mold surface during ejection.
Here’s my formula: for every $0.025\text{ mm}$ ($0.001\text{ inch}$) of texture depth, I add an additional $1^{\circ}$ of draft on top of my base draft. For deep, aggressive textures, I’ve had to push the draft as high as $5^{\circ}$ or even $7^{\circ}$ on tall ribs.
Strategic Placement
Where you apply the draft is as important as how much. Always apply draft outward from the Parting Line—the place where the two halves of the mold separate.
Internal Features (Holes and Pockets): These shrink onto the mold steel. These should always get a very generous draft, sometimes even more than external walls, because they are inherently harder to eject.
External Features: These shrink away from the mold cavity. While you still need draft to prevent drag during the initial separation, you can sometimes get away with slightly less draft here than on internal features.
Summary
Successful design is about respecting the physical properties of the materials and the limits of the machines. When I design with proper draft from the very first sketch, I’m not just making a part; I’m making a repeatable, reliable, and profitable production process.